Dark Chocolate Skull Almonds Recipe


Introduction
If you’re looking for a Halloween treat that is simple to prepare, visually striking, and deliciously chocolatey, these Dark Chocolate Skull Almonds are an excellent choice.
Crunchy almonds are surrounded by smooth dark chocolate and molded into spooky skull shapes, creating a fun combination of texture and appearance. The slightly bitter flavor of dark chocolate pairs beautifully with the natural nuttiness of roasted almonds, making these treats feel a little more sophisticated than traditional Halloween candy.
They’re perfect for Halloween parties, dessert boards, candy tables, school celebrations, or simply making something festive at home.
The best part? You don’t need advanced pastry skills. With a skull-shaped silicone mold and a few quality ingredients, you can create professional-looking chocolate treats in your own kitchen.
Why You’ll Love This Recipe
💀 Perfect for Halloween
The skull shape instantly gives these chocolates a spooky seasonal appearance.
🍫 Rich Dark Chocolate
Dark chocolate provides an intense cocoa flavor that balances the sweetness of the treat.
🌰 Crunchy Almond Center
Whole roasted almonds add satisfying crunch and a naturally nutty flavor.
👩🍳 Easy to Make
The preparation requires only a few ingredients and simple molding techniques.
🎁 Great Homemade Gift
Package the finished skull chocolates in small bags or decorative boxes for Halloween gifts.
🎃 Perfect for Parties
Arrange them on a Halloween dessert board alongside cookies, brownies, and other spooky treats.
Ingredients
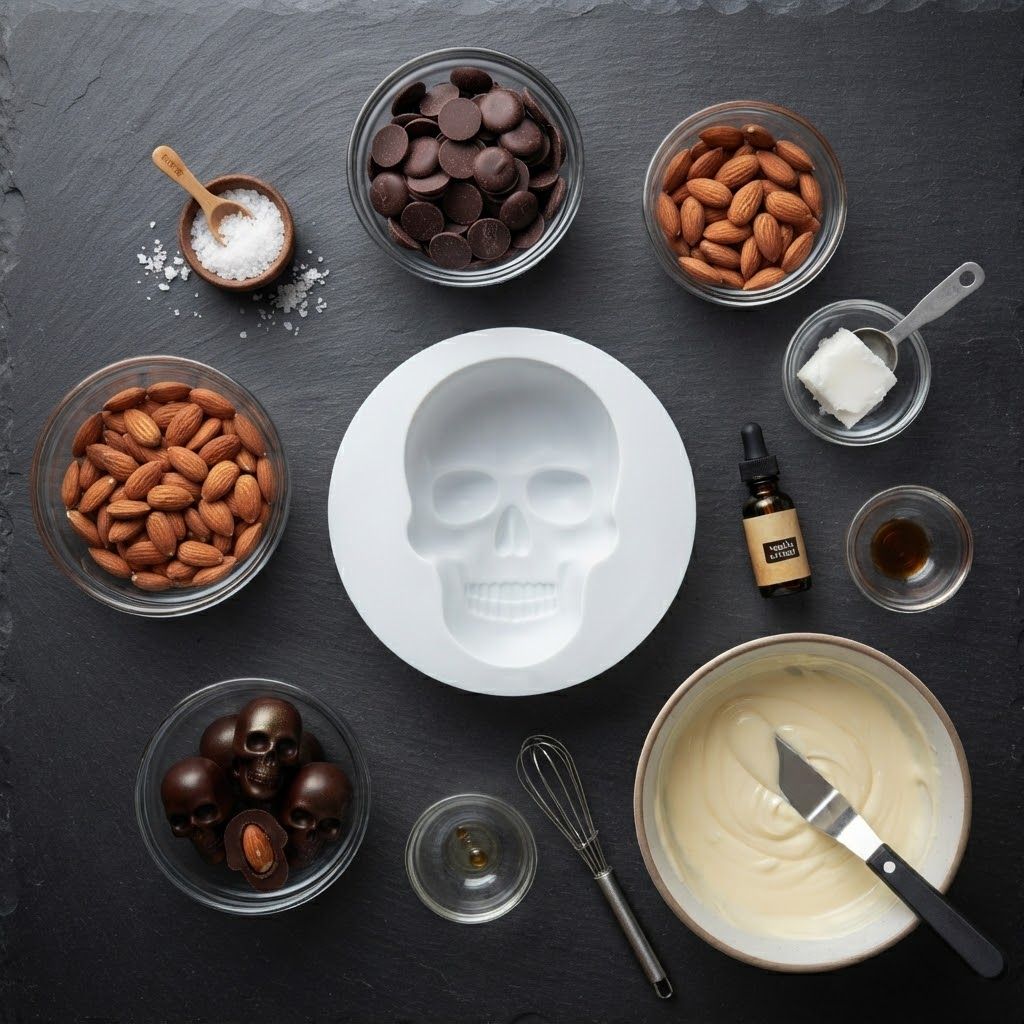
For approximately 18–24 skull chocolates, depending on the size of your mold:
- 8 oz (225 g) dark chocolate
- 18–24 whole almonds
- 1 teaspoon coconut oil, optional
- ½ teaspoon vanilla extract, optional
- Pinch of sea salt, optional
Optional Decorations
- White chocolate
- Orange candy melts
- Edible gold dust
- Cocoa powder
- Crushed almonds
- Halloween sprinkles
For the best flavor, choose a good-quality dark chocolate with a cocoa percentage you enjoy.
Choosing the Right Chocolate
The chocolate is the main flavor component, so quality matters.
Dark Chocolate
Dark chocolate creates a sophisticated, less-sweet treat and pairs especially well with almonds.
Semi-Sweet Chocolate
Use semi-sweet chocolate if you prefer a sweeter result.
Milk Chocolate
Milk chocolate produces a creamier and sweeter Halloween candy.
For a balanced flavor, dark chocolate in the 60–70% cocoa range works particularly well.
Equipment You’ll Need
- Skull-shaped silicone chocolate mold
- Microwave-safe bowl or double boiler
- Silicone spatula
- Small spoon or piping bag
- Refrigerator
- Baking sheet or flat tray
- Parchment paper
A silicone mold is highly recommended because it makes removing the finished chocolates much easier.
How to Make Dark Chocolate Skull Almonds

Step 1: Prepare the Almonds
Use whole almonds that are fresh and preferably roasted.
If using raw almonds, toast them lightly in a dry skillet or oven until fragrant.
Allow them to cool completely before using.
Roasted almonds provide a deeper flavor and a much more satisfying crunch.
Step 2: Melt the Chocolate
Break the dark chocolate into small, evenly sized pieces.
Place it in a microwave-safe bowl.
Heat in short intervals of approximately 20–30 seconds, stirring thoroughly between each interval.
Continue until the chocolate is almost completely melted.
Stir until completely smooth.
Avoid overheating the chocolate because excessive heat can cause it to become thick, dull, or grainy.
Alternative: Double Boiler
Place the chocolate in a heatproof bowl over a saucepan containing gently simmering water.
Make sure the bottom of the bowl does not touch the water.
Stir continuously until smooth.
Step 3: Add Coconut Oil
If desired, stir approximately 1 teaspoon of coconut oil into the melted chocolate.
This can make the chocolate slightly smoother and easier to work with.
Don’t add too much, as excessive oil can prevent the chocolate from setting properly.
Step 4: Fill the Skull Mold
Place the silicone skull mold on a flat baking sheet.
This makes the mold much easier to move without spilling chocolate.
Spoon a small amount of melted chocolate into each skull cavity.
Use the back of the spoon to push chocolate into the detailed areas, especially around:
- Eye sockets
- Nose
- Teeth
- Cheekbones
This helps ensure that the skull design is clearly visible once the chocolate sets.
Step 5: Add the Almond
Place one whole almond into each chocolate-filled cavity.
Position it in the center.
If the almond is large, gently press it into the chocolate without forcing it all the way to the bottom.
The chocolate should surround the almond and create a secure coating.
Step 6: Cover With More Chocolate
Spoon additional melted chocolate over each almond.
Fill the cavities until the almonds are completely covered.
Use a spatula to gently smooth the surface.
Tap the baking sheet lightly against the counter a few times to release any trapped air bubbles.
Step 7: Chill
Place the mold in the refrigerator for approximately 20–30 minutes, or until the chocolate has completely hardened.
If your kitchen is cool, the chocolates may also set at room temperature.
The refrigerator simply speeds up the process.
Step 8: Remove From the Mold
Once completely firm, gently flex the silicone mold.
Push each skull from the underside.
The chocolates should release easily.
Avoid pressing directly on the delicate skull details.
Step 9: Decorate
For an extra spooky appearance, you can add small decorative details.
Melt a little white chocolate and use a toothpick or very fine piping tip to highlight:
- Teeth
- Eye sockets
- Skull details
You can also add a tiny amount of edible gold dust for a more elegant Halloween presentation.
Professional Tips for Perfect Chocolate Skulls
Keep Water Away From the Chocolate
Even a small amount of water can cause melted chocolate to seize and become thick.
Make sure bowls, utensils, and molds are completely dry.
Don’t Overheat Chocolate
Chocolate should be melted gently.
Short microwave intervals are safer than heating it continuously.
Use a Stable Work Surface
Place the silicone mold on a baking sheet before filling it.
This prevents accidental spills.
Tap Out Air Bubbles
A few gentle taps help chocolate settle into the detailed skull cavities.
Let the Chocolate Set Completely
Don’t remove the chocolates too early.
If the chocolate is still soft, the skull details can become damaged.
How to Make the Skull Details More Visible
The skull shape is the main visual attraction, so definition matters.
After filling the mold, gently rotate it or use a small pastry brush to make sure chocolate reaches every cavity.
Pay particular attention to the eye sockets and teeth.
For even more definition, allow a thin layer of dark chocolate to set first. Then add the almond and remaining chocolate.
This creates a more structured skull shape.
Halloween Presentation Ideas
These chocolate skull almonds look beautiful when served on a dark dessert platter.
Arrange them with:
- Mini pumpkins
- Chocolate cookies
- Pretzels
- Candy corn
- Fresh almonds
- Dark chocolate bark
- Halloween sprinkles
For an elegant adult Halloween table, combine the skull chocolates with dark chocolate truffles, caramel candies, and dried fruit.
Homemade Halloween Gift Idea
These treats are perfect for gifting.
Once completely set, place several skull chocolates inside a small clear cellophane bag.
Tie with black, orange, or purple ribbon.
Add a small label such as:
“Spooky Chocolate Skull Almonds”
You can also place them inside decorative Halloween boxes for party favors.
Flavor Variations
Sea Salt Dark Chocolate Skulls
Sprinkle a tiny amount of flaky sea salt over the chocolate before it sets.
The salt enhances the richness of the dark chocolate.
Orange Dark Chocolate Almonds
Add a little finely grated orange zest to the melted chocolate.
Dark chocolate and orange make an excellent combination.
Cinnamon Chocolate Skulls
Add a small pinch of cinnamon for a warm, autumn-inspired flavor.
Espresso Dark Chocolate
Mix a small amount of instant espresso powder into the melted chocolate for a deeper chocolate flavor.
Spicy Chocolate Almonds
Add a tiny pinch of cayenne or chili powder for a subtle spicy finish.
Storage
Store the finished chocolate skull almonds in an airtight container.
Keep them in a cool, dry place away from direct sunlight and strong odors.
If your kitchen is particularly warm, refrigeration can help prevent the chocolate from becoming soft.
Allow refrigerated chocolates to sit at room temperature for several minutes before serving for the best texture.
Can You Make Them Ahead?
Absolutely.
These chocolate skull almonds are an excellent make-ahead Halloween dessert.
Prepare them 1–3 days before your event and store them properly in an airtight container.
This makes them particularly convenient for:
- Halloween parties
- School celebrations
- Family gatherings
- Dessert tables
- Halloween gift baskets
Frequently Asked Questions
Can I Use Milk Chocolate?
Yes. Milk chocolate creates a sweeter and creamier version.
Can I Use Different Nuts?
Absolutely. Hazelnuts, pecans, cashews, and macadamia nuts can all work, provided they fit comfortably inside your mold.
Do I Need a Skull Mold?
A skull silicone mold gives the best result, but you can use other Halloween-themed molds such as pumpkins, ghosts, bats, or spiders.
Why Is My Chocolate Dull?
Chocolate can become dull if it is overheated or exposed to moisture. For a glossy finish, melt it gently and keep all equipment completely dry.
Can I Temper the Chocolate?
Yes. Tempering creates a shinier finish and a more professional snap. If you plan to make a large batch as gifts, tempering is worth considering.
How to Temper Dark Chocolate for a Professional Finish
If you want a glossy, bakery-style appearance, tempering the chocolate can improve the final result.
A simple seeding method involves:
- Melt approximately two-thirds of the chocolate gently.
- Remove it from the heat.
- Add the remaining finely chopped chocolate.
- Stir continuously until melted and slightly cooled.
- Use the tempered chocolate to fill the molds.
Proper tempering helps the finished chocolates become glossy and firm with a clean snap.
For precise results, a digital thermometer is recommended.
Recipe Summary
Preparation: 15 minutes
Chilling: 20–30 minutes
Total Time: About 45 minutes
Yield: Approximately 18–24 chocolates
Difficulty: Easy
Final Thoughts

These Dark Chocolate Skull Almonds are proof that a Halloween dessert doesn’t need to be complicated to make a big impression.
The combination of rich dark chocolate and crunchy roasted almonds creates a delicious contrast, while the skull-shaped molds transform a simple chocolate treat into an eye-catching Halloween dessert.
They’re easy enough for beginners, attractive enough for a party dessert table, and versatile enough to customize with different chocolates, spices, toppings, and nuts.
Whether you’re preparing a spooky Halloween party, creating homemade candy gifts, or simply looking for a fun seasonal snack, these Chocolate Skull Almonds are a delicious and memorable choice.
Rich dark chocolate + crunchy almonds + spooky skull shapes = the perfect homemade Halloween treat. 💀🍫🎃