Easy Halloween Dirt Cups Recipe


The Ultimate No-Bake Halloween Dessert for Kids & Parties
Prep Time: 20 minutes
Chill Time: 30 minutes
Total Time: 50 minutes
Servings: 8 cups
Course: Dessert
Cuisine: American
The Perfect No-Bake Halloween Treat
Halloween is the perfect season for fun, festive desserts, and these Easy Halloween Dirt Cups are guaranteed to steal the spotlight at any celebration. Featuring creamy chocolate pudding, fluffy whipped topping, crushed Oreo cookies, and playful Halloween decorations, this simple dessert transforms everyday ingredients into an eye-catching spooky masterpiece.
Whether you’re hosting a Halloween party, preparing classroom treats, or making memories with your family, these adorable dirt cups are a delicious choice that both kids and adults will love. Best of all, they’re completely no-bake, making them quick to prepare while still delivering impressive results.
The rich chocolate layers paired with crunchy cookie crumbs create the classic « dirt » effect, while candy pumpkins, gummy worms, and cookie tombstones give each cup a festive Halloween look. They’re fun to assemble, easy to customize, and perfect for making ahead of time.
Why You’ll Love This Recipe
There are countless Halloween desserts, but these dirt cups remain one of the most popular because they’re simple, delicious, and incredibly fun to make.
- No baking required
- Ready in less than one hour
- Perfect for Halloween parties
- Great make-ahead dessert
- Kid-friendly and family-approved
- Easy to decorate with your favorite Halloween candies
- Rich, creamy, and full of chocolate flavor
- Budget-friendly ingredients
- Individual servings make entertaining easy
Ingredients
For the Dirt Cups
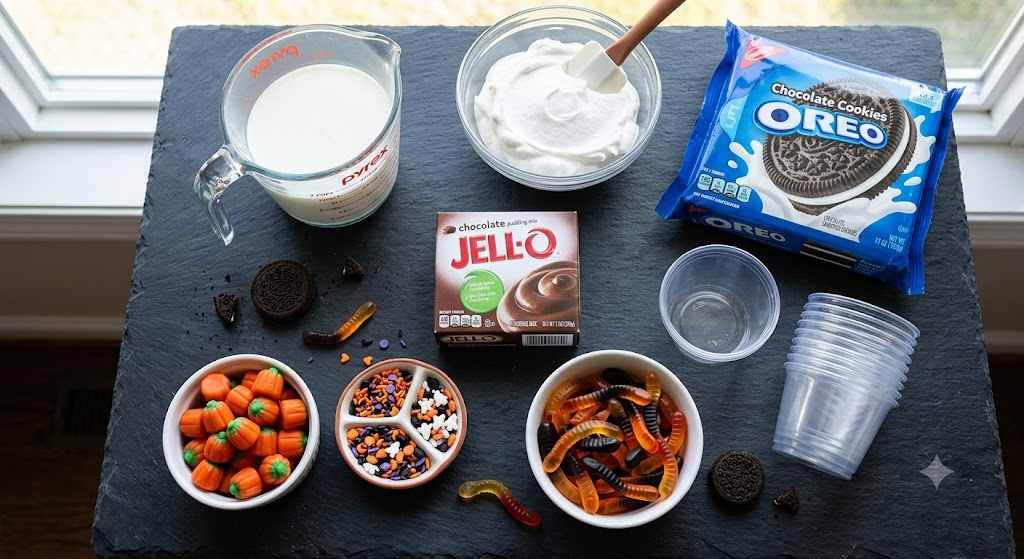
- 1 package (3.9 oz / 110 g) instant chocolate pudding mix
- 2 cups cold whole milk
- 1 container (8 oz / 225 g) whipped topping, thawed
- 24 Oreo cookies, finely crushed
- 8 clear dessert cups (9-ounce)
Halloween Decorations
- 8 Milano or oval shortbread cookies
- Chocolate decorating gel or melted chocolate
- Gummy worms
- Candy pumpkins
- Candy corn (optional)
- Candy eyeballs
- Halloween sprinkles
- Mini marshmallows (optional)
Kitchen Equipment
- Large mixing bowl
- Whisk
- Rubber spatula
- Food processor or rolling pin
- Zip-top bag
- Spoon
- Piping bag (optional)
- Clear serving cups
How to Make Halloween Dirt Cups

Step 1 – Prepare the Chocolate Pudding
In a large bowl, whisk together the instant chocolate pudding mix and cold milk for about two minutes until smooth and thick. Let the pudding rest for five minutes so it can fully set.
Step 2 – Fold in the Whipped Topping
Using a rubber spatula, gently fold the whipped topping into the pudding until light, fluffy, and completely combined. Avoid overmixing to keep the mixture airy.
Step 3 – Crush the Oreo Cookies
Place the Oreo cookies into a food processor and pulse until they become fine crumbs. If you don’t have a food processor, place the cookies in a sealed plastic bag and crush them using a rolling pin.
Step 4 – Create the First Layer
Add approximately two tablespoons of crushed cookies to the bottom of each dessert cup. This creates the first « dirt » layer.
Step 5 – Add the Chocolate Filling
Spoon or pipe a generous layer of chocolate pudding over the cookie crumbs until each cup is about halfway full.
Step 6 – Repeat the Layers
Add another layer of crushed cookies followed by another layer of chocolate pudding. Finish with a generous topping of Oreo crumbs to create the realistic dirt effect.
Step 7 – Decorate
Decorate each cup with a Milano cookie written with « RIP » using melted chocolate or decorating gel. Add gummy worms, candy pumpkins, Halloween sprinkles, candy eyeballs, or any festive decorations you like to create your own spooky dessert.
Step 8 – Chill and Serve
Place the dirt cups in the refrigerator for at least 30 minutes before serving. Chilling allows the pudding to firm up and the flavors to blend together beautifully.
Expert Tips
- Use whole milk for a richer pudding.
- Crush the cookies into very fine crumbs for the best dirt appearance.
- Pipe the pudding into the cups for clean, even layers.
- Decorate just before serving to keep the toppings fresh.
- Chill for at least 30 minutes before serving.
- Prepare the cups one day in advance for stress-free entertaining.
Fun Decorating Ideas
Haunted Graveyard
Decorate with RIP cookies, gummy worms, candy pumpkins, and chocolate cookie crumbs.
Pumpkin Patch
Top with candy pumpkins, green icing vines, and orange sprinkles.
Spider Web Cups
Pipe white icing into spiderweb designs and add chocolate spiders.
Ghost Garden
Use marshmallow ghosts, candy eyes, and crushed cookies for a spooky cemetery scene.
Recipe Variations
Peanut Butter Dirt Cups
Add creamy peanut butter to the chocolate pudding and garnish with chopped peanut butter cups.
Cookies & Cream Version
Replace the chocolate pudding with cookies-and-cream pudding for a lighter variation.
Pumpkin Spice Dirt Cups
Use vanilla pudding mixed with pumpkin spice seasoning for a delicious fall twist.
Triple Chocolate Dirt Cups
Layer chocolate pudding, chocolate mousse, and brownie crumbs for an extra indulgent dessert.
Storage Instructions
Store the dirt cups covered in the refrigerator for up to 3 days. For the best presentation, add the Halloween decorations shortly before serving. Freezing is not recommended, as the pudding may lose its smooth and creamy texture after thawing.
Frequently Asked Questions
Can I make Halloween Dirt Cups ahead of time?
Yes. Prepare the dessert up to one day in advance and decorate just before serving.
Can children help make this recipe?
Absolutely. Kids love crushing the cookies, layering the pudding, and decorating each cup with spooky candies.
Can I use homemade chocolate pudding?
Yes. Homemade pudding creates an even richer flavor and a creamier texture.
Which cookies work best?
Classic Oreo cookies are ideal because they create the most realistic dirt appearance and provide rich chocolate flavor.
Can I make this recipe gluten-free?
Yes. Simply substitute gluten-free chocolate sandwich cookies for the Oreos.
Nutrition Information (Per Serving)
- Calories: 360 kcal
- Carbohydrates: 48 g
- Protein: 4 g
- Fat: 17 g
- Saturated Fat: 9 g
- Cholesterol: 15 mg
- Sodium: 220 mg
- Sugar: 28 g
- Fiber: 2 g
Nutrition values are approximate and may vary depending on the ingredients and brands used.
Final Thoughts

These Easy Halloween Dirt Cups are a fun, festive, and delicious dessert that’s perfect for celebrating the Halloween season. Their creamy chocolate layers, crunchy Oreo « dirt, » and playful decorations make them an instant favorite for kids and adults alike. Since they’re quick to prepare, require no baking, and can be made ahead of time, they’re an excellent choice for parties, school events, or family gatherings.
With endless decorating possibilities, every dirt cup can become a unique spooky creation. Whether you’re hosting a haunted Halloween party or simply looking for a fun dessert to enjoy with loved ones, this recipe is sure to bring smiles and become a tradition you’ll look forward to making every year.