Halloween Cookie Recipes: Easy, Cute & Spooky Halloween Treats


Halloween Cookie Recipes are a fun and delicious way to celebrate the spooky season. Whether you are preparing treats for a Halloween party, baking with your children, or creating a festive dessert table, homemade Halloween cookies are always a great choice. With soft, chewy centers, sweet chocolate chips, and adorable pumpkin decorations, these cookies are as beautiful as they are delicious.
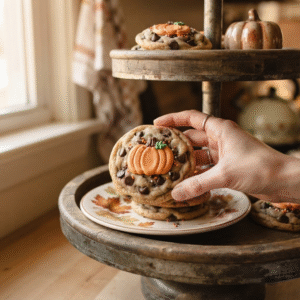
These easy Halloween cookies combine the classic taste of homemade chocolate chip cookies with creative seasonal decorations. Each cookie can be topped with white icing and a cute orange pumpkin design to create a festive look that is perfect for October celebrations.
The best part is that you do not need professional baking skills to make them. With simple ingredients, easy decorating techniques, and a little creativity, you can prepare delicious Halloween treats that everyone will love.
Whether you are looking for cute Halloween cookies, spooky party desserts, or easy Halloween baking ideas, this recipe is perfect for sharing with family and friends.
Why You’ll Love These Halloween Cookie Recipes
These Halloween cookies are more than just a sweet treat. They are a fun baking project that brings creativity and festive flavors to your kitchen.
- Easy to make: The cookie dough uses simple ingredients that are easy to find in most grocery stores.
- Soft and chewy: Each cookie has a tender center with lightly golden edges and delicious chocolate chips.
- Festive decorations: White icing and orange pumpkin designs create a cute Halloween appearance.
- Perfect for parties: These cookies make a lovely addition to Halloween dessert tables, school parties, and family gatherings.
- Fun for kids: Children can help decorate the cookies with colorful icing and spooky designs.
- Customizable: You can use different icing colors, sprinkles, candy eyes, or chocolate decorations.
- Make-ahead friendly: The cookie dough can be prepared in advance, making party preparation easier.
These homemade Halloween cookies are ideal for anyone who wants to create delicious and eye-catching seasonal desserts without complicated techniques.
Ingredients for Halloween Chocolate Chip Cookies

You only need a few everyday baking ingredients to prepare these soft and chewy Halloween cookies.
For the Cookies
- 2 1/4 cups all-purpose flour: Provides structure and helps the cookies hold their shape.
- 1 teaspoon baking soda: Helps the cookies rise and creates a soft texture.
- 1/2 teaspoon salt: Balances the sweetness and enhances the chocolate flavor.
- 3/4 cup unsalted butter, softened: Adds richness and creates a tender cookie texture.
- 3/4 cup brown sugar: Gives the cookies moisture, a slight caramel flavor, and chewy centers.
- 1/2 cup granulated sugar: Adds sweetness and helps the edges become lightly golden.
- 1 large egg: Binds the ingredients together and contributes to the cookie structure.
- 1 teaspoon vanilla extract: Enhances the overall flavor.
- 1 cup semi-sweet chocolate chips: Adds rich chocolate flavor to every bite.
For the Pumpkin Decorations
- 1 cup powdered sugar: Creates the base for a smooth icing.
- 1–2 tablespoons milk or water: Helps achieve the desired icing consistency.
- 1/2 teaspoon vanilla extract: Adds flavor to the icing.
- Orange food coloring: Creates the pumpkin design.
- Green food coloring: Adds small pumpkin stems.
- White icing: Creates the background for the decorations.
You can also use ready-made decorating icing if you want to save time.
How to Make Halloween Cookie Recipes

Making these Halloween cookies is simple, even if you are new to baking. Follow these steps to create soft chocolate chip cookies with adorable pumpkin decorations.
Step 1: Prepare the Oven and Baking Sheet
Preheat your oven to 350°F (175°C).
Line two baking sheets with parchment paper to prevent the cookies from sticking and to make cleanup easier.
Measure all your ingredients before you begin. Make sure the butter is softened but not melted, as this helps create the right cookie texture.
Step 2: Combine the Dry Ingredients
In a medium mixing bowl, whisk together the all-purpose flour, baking soda, and salt.
Mixing the dry ingredients separately helps distribute the baking soda evenly throughout the dough, allowing the cookies to bake consistently.
Set the bowl aside while you prepare the wet ingredients.
Step 3: Cream the Butter and Sugar
In a large mixing bowl, beat the softened butter, brown sugar, and granulated sugar together until the mixture becomes light and creamy.
This usually takes about 2–3 minutes with an electric mixer on medium speed.
Add the egg and vanilla extract. Continue mixing until everything is smooth and fully combined.
Creaming the butter and sugar helps create a soft texture and contributes to the cookies’ slightly crisp edges.
Step 4: Mix the Cookie Dough
Gradually add the dry ingredients to the butter mixture.
Mix on low speed or use a spatula until the flour is just incorporated. Avoid overmixing, as this can make the cookies tough.
Fold in the semi-sweet chocolate chips, distributing them evenly throughout the dough.
The finished dough should be soft and thick enough to scoop.
Step 5: Shape the Cookies
Use a cookie scoop or tablespoon to portion the dough into evenly sized balls.
Place them on the prepared baking sheets, leaving approximately 2 inches between each cookie to allow room for spreading.
Gently flatten the dough balls slightly if needed, but keep them thick enough to produce soft centers.
For more consistent results, chill the shaped dough in the refrigerator for 20–30 minutes before baking.
Step 6: Bake Until Golden
Bake the cookies for approximately 10–12 minutes, or until the edges are lightly golden and the centers look slightly soft.
Avoid overbaking, because the cookies will continue to firm up as they cool.
Remove the baking sheets from the oven and allow the cookies to rest for about 5 minutes before transferring them to a wire rack.
Let the cookies cool completely before decorating them with icing.
Step 7: Prepare the Decorating Icing
In a small bowl, combine the powdered sugar, vanilla extract, and one tablespoon of milk or water.
Stir until the mixture becomes smooth. Add more liquid a few drops at a time if the icing is too thick.
Divide the icing into separate bowls. Keep one portion white, color another portion orange, and add green food coloring to a small portion for the pumpkin stems.
Transfer each color to a piping bag or a small resealable bag with a tiny corner cut off.
Step 8: Decorate the Halloween Cookies
Spread or pipe a small white icing circle in the center of each cooled cookie to create a background for the pumpkin decoration.
Allow the white icing to set slightly before adding the orange pumpkin design.
Use orange icing to pipe a small pumpkin shape. Add a little green icing at the top to create a stem.
You can also use the orange icing to make jack-o’-lantern faces, adding small eyes and a smiling mouth for a playful Halloween look.
Allow the decorated cookies to dry completely before stacking or storing them.
Tips for the Best Halloween Cookies
A few simple baking tips can help you create beautiful Halloween cookies with the perfect texture.
- Use room-temperature ingredients: Softened butter and a room-temperature egg help the dough mix evenly.
- Measure flour carefully: Too much flour can create dry, dense cookies. Use a kitchen scale when possible.
- Do not overmix: Mix the dough only until the ingredients are combined to keep the cookies tender.
- Chill the dough: Refrigerating the dough can reduce excessive spreading and improve the texture.
- Avoid overbaking: Remove the cookies when the edges are lightly golden and the centers are still slightly soft.
- Cool before decorating: Warm cookies can cause the icing to melt or slide off.
- Use piping bags: Small piping bags make it easier to create detailed pumpkin shapes and other Halloween designs.
For the best appearance, allow each icing layer to set before adding another color.
Creative Halloween Cookie Decorating Ideas
One of the most enjoyable parts of making Halloween Cookie Recipes is decorating them. You can use the same cookie dough to create a variety of spooky and adorable designs.
Pumpkin Halloween Cookies
Use orange icing to create small pumpkins with green stems. Add simple lines to give the pumpkins more detail. These cookies are perfect for a cute autumn-inspired dessert table.
Jack-o’-Lantern Cookies
Decorate your cookies with orange icing and add black icing or chocolate decorations to create spooky eyes, noses, and smiling mouths.
Ghost Halloween Cookies
Use white icing to create ghost shapes or white ghost designs on round cookies. Add small chocolate eyes for a simple and fun decoration.
Spiderweb Cookies
Spread a layer of white icing over the cookies and pipe thin circles of dark chocolate or black icing on top. Use a toothpick to gently pull lines from the center outward to create a spiderweb pattern.
Chocolate Halloween Cookies
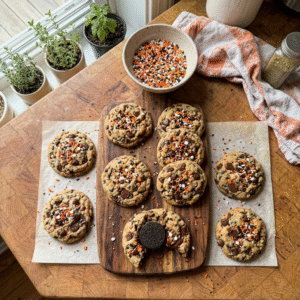
For chocolate lovers, add cocoa powder to a portion of the cookie dough or drizzle melted dark chocolate over the finished cookies. Decorate with orange and green sprinkles for a festive look.
These creative ideas allow you to prepare a colorful assortment of Halloween cookies using one basic recipe.
How to Serve Halloween Cookies
Halloween cookies are perfect for parties, family gatherings, and seasonal celebrations.
Arrange them on a large serving platter with Halloween-themed decorations, such as small pumpkins, autumn leaves, or festive napkins.
You can also display them on a tiered dessert stand alongside brownies, cupcakes, and other homemade Halloween treats.
For a children’s Halloween party, serve the cookies with milk, hot chocolate, or apple cider. For an autumn dessert table, combine them with caramel popcorn, chocolate-covered pretzels, and seasonal fruit.
If you are preparing a Halloween party buffet, use different cookie designs to create a colorful and attractive display.
How to Store Halloween Cookies
Proper storage helps keep your homemade Halloween cookies fresh and delicious.
At room temperature: Store undecorated cookies in an airtight container at room temperature for up to 4–5 days. Decorated cookies can also be stored this way once the icing has fully set, provided the icing is suitable for room-temperature storage.
In the refrigerator: If your decorations contain perishable ingredients, store the cookies in an airtight container in the refrigerator and follow the storage guidance for those ingredients.
In the freezer: Freeze undecorated baked cookies in a freezer-safe container for up to 2–3 months for best quality. Separate layers with parchment paper to prevent sticking.
Make-ahead tip: Prepare the cookie dough in advance and refrigerate it for up to 2 days, or freeze portions of unbaked dough for convenient future baking. Thaw frozen dough in the refrigerator before baking and adjust the baking time if needed.
For the best results, decorate the cookies after baking and cooling, preferably closer to the day you plan to serve them.
Common Mistakes to Avoid
Even simple Halloween baking recipes can be affected by a few common mistakes.
Using melted butter: Melted butter can cause the cookies to spread too much. Use softened butter for a thicker, softer cookie.
Adding too much flour: Excess flour can make cookies dry and crumbly. Measure carefully and avoid packing flour into the measuring cup.
Overbaking the cookies: Baking for too long can make the cookies hard. Remove them when the edges are lightly golden.
Decorating warm cookies: Icing melts easily when applied to warm cookies. Always wait until the cookies are completely cool.
Making icing too runny: Thin icing can spread beyond the intended design. Add powdered sugar gradually until it reaches a consistency that is easy to pipe.
Avoiding these mistakes will help you create cookies that look attractive and taste delicious.
Frequently Asked Questions
Can I Make Halloween Cookies Ahead of Time?
Yes. You can prepare the dough ahead of time, refrigerate it, and bake the cookies when needed. You can also bake the cookies in advance and decorate them once they have cooled.
How Do I Keep Halloween Cookies Soft?
Store the cooled cookies in an airtight container to help retain moisture. Avoid overbaking, as this is one of the main reasons cookies become dry.
Can I Use Store-Bought Cookie Dough?
Yes. Store-bought chocolate chip cookie dough is a convenient alternative when you are short on time. Bake according to the package instructions, allow the cookies to cool, and decorate them with Halloween-themed icing.
Can I Make These Halloween Cookies Without Chocolate Chips?
Absolutely. You can leave out the chocolate chips or replace them with white chocolate chips, colorful sprinkles, or chopped nuts.
How Do I Make Orange Icing for Halloween Cookies?
Mix powdered sugar with a small amount of milk or water until smooth. Add orange food coloring gradually until you achieve the desired shade.
Can Kids Help Decorate Halloween Cookies?
Yes. Decorating is a fun activity for children when supervised by an adult. Allow the cookies to cool completely, then provide different icing colors, sprinkles, and edible decorations.
Can I Make These Cookies Gluten-Free?
Yes. You can use a suitable gluten-free all-purpose flour blend designed for baking. Check the product instructions and note that the texture may differ slightly from cookies made with regular flour.
Final Thoughts

These Halloween Cookie Recipes are a fun and delicious way to bring creativity into your fall baking. With soft, chewy chocolate chip cookies and adorable pumpkin decorations, they are perfect for Halloween parties, family gatherings, school celebrations, and homemade seasonal treats.
The simple ingredients and easy decorating techniques make this recipe suitable for beginner bakers and experienced home cooks alike. You can personalize each cookie with pumpkins, ghosts, jack-o’-lantern faces, or colorful Halloween sprinkles to create a dessert that matches your celebration.
Prepare a batch, invite your family to help decorate, and enjoy these festive homemade cookies throughout the Halloween season.
Save this Halloween Cookie Recipes idea on Pinterest, try it at home, and explore more easy Halloween desserts for your next spooky celebration!