How to Make Authentic Ciabatta Bread at Home

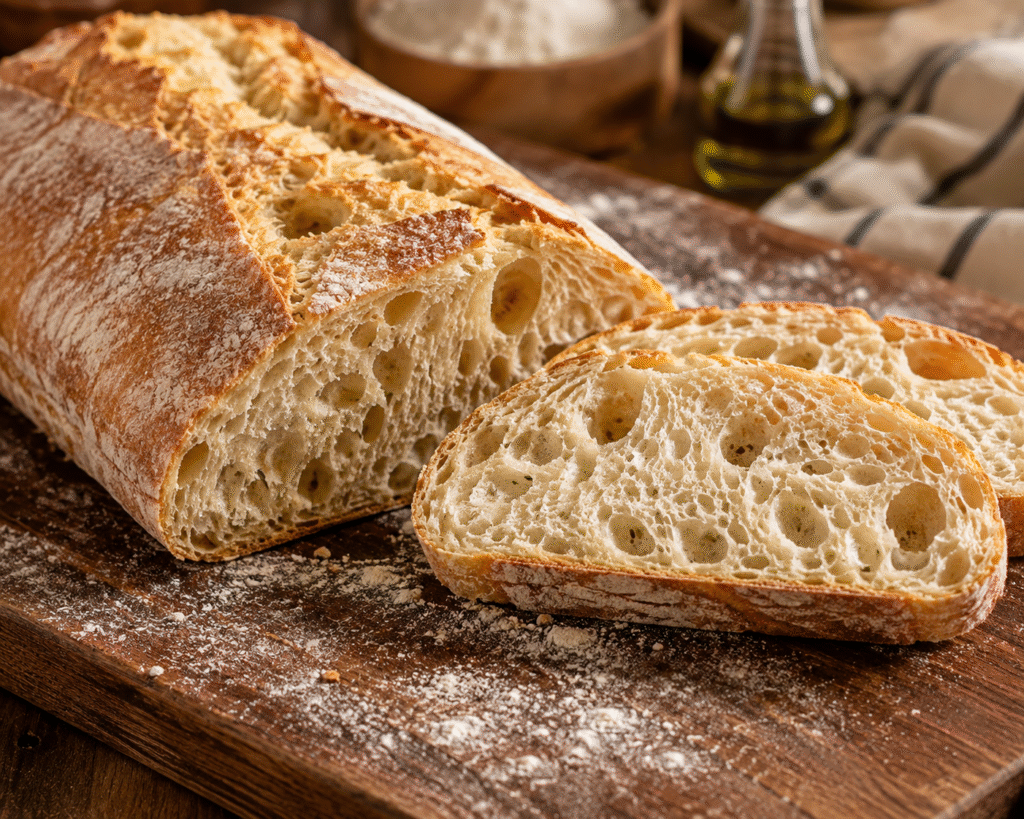
There is something special about a freshly baked loaf of Ciabatta bread. Its rustic golden crust, light texture, and characteristic open crumb make it one of Italy’s most recognizable breads. Although ciabatta may look like a bread best left to professional bakers, it can be made successfully at home with the right technique and a little patience.
This authentic Italian-style ciabatta recipe focuses on developing a high-hydration dough, building gluten through gentle handling, and baking at a high temperature to create a crisp crust and airy interior.
What Is Ciabatta Bread?
Ciabatta is a traditional Italian bread known for its elongated, rustic shape and irregular open crumb. The dough is typically wetter than many standard bread doughs, which helps create its distinctive large air pockets.
The name ciabatta means “slipper” in Italian, referring to the bread’s characteristic flat, elongated shape.
A properly baked ciabatta should have:
- A crisp, golden-brown crust
- A light and airy interior
- Large, irregular holes throughout the crumb
- A slightly chewy texture
- A mild, wheaty flavor
It is especially delicious when served fresh from the oven.
Why Make Ciabatta at Home?
Homemade ciabatta offers a texture and freshness that is difficult to replicate with packaged bread. The crust becomes wonderfully crisp while the interior remains soft and airy.
It is also an extremely versatile bread. Once baked, ciabatta can be used for sandwiches, paninis, bruschetta, garlic bread, breakfast toast, or as an accompaniment to soups and pasta.
Ingredients

For a classic homemade ciabatta, you will generally need:
- Bread flour
- Lukewarm water
- Instant or active dry yeast
- Salt
- Extra-virgin olive oil, optional
Bread flour is particularly useful because its higher protein content helps support the wet dough and contributes to a strong gluten structure.
The amount of water is important because ciabatta is a high-hydration bread. The dough should feel considerably wetter and stickier than a typical sandwich bread dough.
How to Make Ciabatta Bread

1. Mix the Dough
Combine the flour, yeast, and water in a large mixing bowl. Mix until the flour is fully hydrated and no large dry patches remain.
Add the salt and continue mixing until incorporated.
At this stage, the dough will be sticky and loose. Resist the temptation to add a large amount of additional flour.
2. Develop the Gluten
Because the dough contains a high percentage of water, traditional kneading can be difficult.
Instead, use gentle stretching and folding. Grab one side of the dough, stretch it upward, and fold it back toward the center.
Repeat the process around the dough.
Perform several rounds of folds at regular intervals during the first part of fermentation. This gradually strengthens the gluten network without requiring heavy kneading.
3. First Rise
Cover the bowl and allow the dough to rise in a warm, draft-free area.
As fermentation progresses, the dough should become noticeably lighter, puffier, and filled with air bubbles.
The exact fermentation time depends on the temperature of your kitchen, the yeast, and the dough.
For deeper flavor, a longer or refrigerated fermentation can also be used.
4. Prepare the Work Surface
Generously flour your work surface. Ciabatta dough is naturally sticky, so flour is essential when transferring and shaping it.
Carefully turn the fermented dough onto the floured surface.
Avoid aggressively pressing or kneading the dough because you want to preserve the air bubbles created during fermentation.
5. Shape the Ciabatta
Gently stretch the dough into a rectangular shape.
Divide it into individual loaves if desired. Handle each piece carefully and avoid excessive degassing.
Transfer the shaped dough onto parchment paper or a well-floured baking surface.
Allow the dough to rest again before baking.
6. Preheat the Oven
For the best crust, the oven should be thoroughly preheated.
A very hot oven encourages strong oven spring, helping the dough expand rapidly during the first stage of baking.
A baking stone, baking steel, or preheated heavy baking tray can also help create a professional-style crust.
7. Bake Until Golden
Carefully transfer the dough into the hot oven.
Bake until the loaves develop a deep golden-brown crust and sound hollow when tapped.
Steam during the beginning of baking can help create a thinner, crispier crust. If using steam, introduce it safely according to your oven setup.
8. Cool Before Slicing
Once baked, transfer the ciabatta to a wire rack.
Allow the bread to cool before slicing. Cutting into the loaf immediately can compress the crumb and release moisture too quickly.
Once cooled, slice the bread and enjoy its beautiful open texture.
The Secret to an Airy Ciabatta Crumb
The characteristic open crumb comes from several factors working together.
High hydration: A wetter dough encourages a light, open structure.
Strong gluten development: Stretch-and-fold techniques strengthen the dough while preserving its elasticity.
Proper fermentation: Allowing enough time for fermentation gives yeast time to produce the gases responsible for the air pockets.
Gentle shaping: Excessive handling can destroy the bubbles that have developed.
High-temperature baking: Strong initial heat helps the loaf expand rapidly in the oven.
Common Ciabatta Mistakes
Adding Too Much Flour
Because ciabatta dough is sticky, it can be tempting to add flour while mixing. Too much flour can produce a dense loaf instead of the characteristic airy crumb.
Use flour primarily on your work surface and hands when necessary.
Overworking the Dough
Aggressive kneading or shaping can remove the air bubbles developed during fermentation.
Handle the dough gently once fermentation is well underway.
Under-Fermenting
If the dough has not fermented sufficiently, the finished bread may have a dense crumb and limited oven spring.
Look for visible bubbles and a noticeably expanded dough rather than relying only on a specific time.
Over-Fermenting
On the other hand, excessive fermentation can weaken the dough structure and make shaping difficult.
Watch the dough’s appearance and volume rather than following the clock alone.
Cutting the Bread Too Soon
Fresh bread needs time to finish setting internally. Allowing the loaf to cool helps preserve its structure and prevents a gummy interior.
How to Serve Ciabatta
Fresh ciabatta is incredibly versatile.
Use it for:
- Italian-style sandwiches
- Paninis
- Bruschetta
- Garlic bread
- Avocado toast
- Breakfast sandwiches
- Soup and stew accompaniment
- Dipping into olive oil
- Italian-inspired appetizers
The large holes in the crumb are particularly good at holding flavorful sauces, olive oil, and sandwich fillings.
How to Store Homemade Ciabatta
For the best texture, enjoy ciabatta on the day it is baked.
Store leftover bread at room temperature in a breathable bread bag or wrapped in a clean kitchen towel. Avoid refrigerating bread whenever possible because refrigeration can accelerate staling.
For longer storage, slice the cooled bread and freeze it in an airtight freezer-safe bag. Individual slices can then be thawed and reheated as needed.
Final Thoughts

Making authentic Italian-style Ciabatta bread at home is a rewarding baking project. The dough requires careful handling because of its high hydration, but the result is well worth the effort.
With a crisp golden crust, an airy open crumb, and a wonderfully rustic appearance, homemade ciabatta can elevate everything from a simple sandwich to an elegant Italian dinner.
If you love artisan bread baking, save this recipe to your Pinterest board and try making a fresh batch of ciabatta for your next baking day.