Bloody Brain Cheesecake Bites


The Ultimate No-Bake Halloween Dessert That Will Steal the Show
If you’re looking for a Halloween dessert that’s creepy, creative, and surprisingly easy to make, these Bloody Brain Cheesecake Bites are guaranteed to impress. Featuring a rich chocolate cookie crust, silky smooth cheesecake filling, realistic brain-shaped toppings, and a glossy raspberry « blood » sauce, these mini cheesecakes are the perfect combination of spooky and delicious.
They’re completely no-bake, require only a handful of simple ingredients, and can be prepared ahead of time—making them ideal for Halloween parties, haunted house gatherings, classroom celebrations, or a fun family baking day.
Whether you’re serving kids or adults, these eerie little treats will quickly become the centerpiece of your Halloween dessert table.
Why You’ll Love This Recipe
These Bloody Brain Cheesecake Bites aren’t just eye-catching—they’re incredibly delicious too.
✔ No oven required
✔ Rich, creamy cheesecake filling
✔ Crunchy chocolate cookie crust
✔ Fun Halloween presentation
✔ Easy to prepare ahead of time
✔ Perfect individual servings
✔ Beginner-friendly recipe
✔ Great for Halloween parties and dessert buffets
Recipe Information
- Prep Time: 30 minutes
- Chill Time: 4 hours
- Total Time: 4 hours 30 minutes
- Servings: 12 mini cheesecakes
- Difficulty: Easy
Ingredients
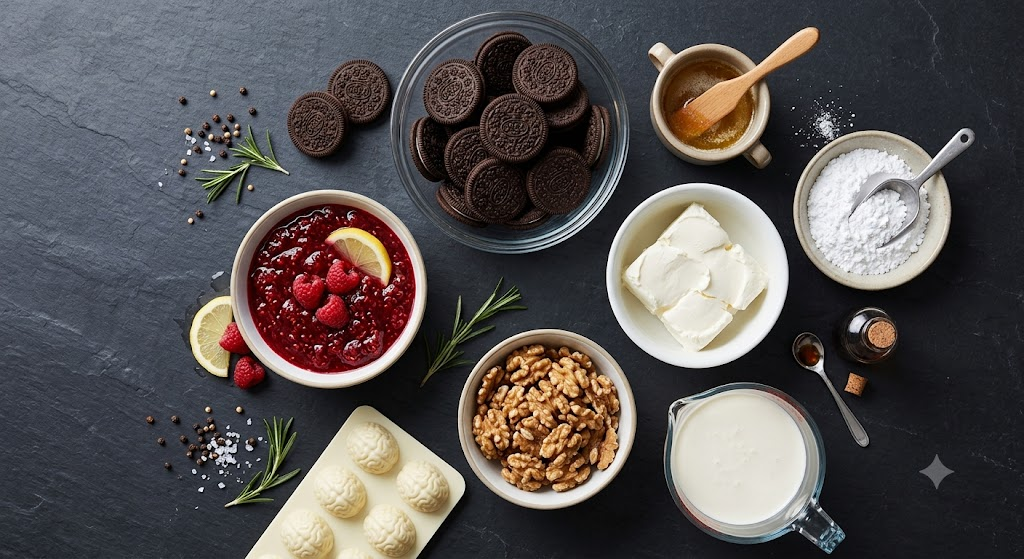
For the Chocolate Crust
- 24 chocolate sandwich cookies (Oreos)
- 5 tablespoons melted butter
For the Cheesecake Filling
- 16 oz (450 g) cream cheese, softened
- ½ cup powdered sugar
- 1 teaspoon vanilla extract
- 1 cup heavy whipping cream, whipped to stiff peaks
For the Brain Topping
- 12 walnut halves
- or silicone brain candy molds with white chocolate
For the Bloody Sauce
- ½ cup raspberry preserves
- 1 tablespoon water
- 1 teaspoon lemon juice
- Red food coloring (optional for brighter color)
Optional Decorations
- Chocolate cookie crumbs
- Plastic spiders
- Halloween cupcake liners
- Black sprinkles
- Edible glitter
- Candy eyeballs
Kitchen Equipment
- Muffin pan
- Cupcake liners
- Mixing bowls
- Electric hand mixer
- Rubber spatula
- Food processor
- Measuring cups
- Spoon
- Small saucepan
Step-by-Step Instructions

Step 1 – Prepare the Cookie Crust
Place the chocolate sandwich cookies into a food processor and blend until they become fine crumbs.
Mix the crumbs with the melted butter until evenly coated.
Divide the mixture among 12 cupcake liners and firmly press it into the bottom of each cup using the back of a spoon.
Place the pan in the refrigerator while preparing the filling.
Step 2 – Make the Cheesecake Filling
In a large mixing bowl, beat the softened cream cheese until smooth and creamy.
Add:
- powdered sugar
- vanilla extract
Continue mixing until silky smooth.
Gently fold the whipped cream into the cheesecake mixture using a spatula until fully incorporated.
Do not overmix.
Step 3 – Fill the Cheesecakes
Spoon the cheesecake filling evenly over each prepared crust.
Smooth the tops with a spoon or offset spatula.
Refrigerate for at least 4 hours, or overnight for the best texture.
Step 4 – Prepare the Bloody Raspberry Sauce
In a small saucepan combine:
- raspberry preserves
- water
- lemon juice
Heat over low heat until smooth.
If desired, add one or two drops of red food coloring for a more dramatic Halloween appearance.
Allow the sauce to cool completely.
Step 5 – Create the Brain Effect
If using walnut halves:
Carefully place one walnut half on top of each chilled cheesecake.
If using chocolate brain molds:
Melt white chocolate, pour into silicone brain molds, chill until firm, then place one chocolate brain on each cheesecake.
Step 6 – Add the « Blood »
Slowly spoon the raspberry sauce over the brain so it gently drips down the sides of the cheesecake.
The dripping effect creates the signature spooky Halloween look.
Step 7 – Decorate
Finish your cheesecake bites with:
- cookie crumbs
- plastic spiders
- candy eyeballs
- edible glitter
- Halloween sprinkles
Serve chilled.
Tips for the Best Cheesecake Bites
- Always use room-temperature cream cheese for a perfectly smooth filling.
- Chill the cheesecakes overnight for the cleanest texture.
- Add the raspberry sauce just before serving for the freshest appearance.
- Use high-quality raspberry preserves for the best flavor and color.
- Freeze the cheesecake bites for 20 minutes before decorating to make them easier to handle.
Delicious Variations
Chocolate Brain Cheesecakes
Mix melted dark chocolate into the cheesecake filling for an extra-rich dessert.
Strawberry Blood Version
Replace raspberry preserves with strawberry jam for a sweeter flavor.
Oreo Cheesecake Version
Fold crushed Oreo cookies into the cheesecake filling before chilling.
Peanut Butter Cheesecake
Add ¼ cup creamy peanut butter to the filling for a rich, nutty twist.
White Chocolate Cheesecake
Mix melted white chocolate into the cheesecake filling for extra sweetness and a luxurious texture.
Make-Ahead Instructions
These mini cheesecakes are perfect for preparing in advance.
- Prepare up to 2 days ahead and refrigerate.
- Add the raspberry « blood » just before serving for the freshest presentation.
- Store covered in the refrigerator until ready to enjoy.
Storage
Refrigerator:
Store in an airtight container for up to 4 days.
Freezer:
Freeze (without raspberry topping) for up to 2 months.
Thaw overnight in the refrigerator before decorating and serving.
Serving Suggestions
These spooky cheesecake bites pair wonderfully with:
- Halloween dessert charcuterie boards
- Hot chocolate
- Pumpkin spice lattes
- Apple cider
- Halloween cookies
- Candy buffets
- Caramel popcorn
- Chocolate-covered strawberries
Frequently Asked Questions
Can I make these without baking?
Yes. This is a completely no-bake cheesecake recipe.
What can I use instead of walnuts?
Silicone brain molds filled with white chocolate create an even more realistic brain effect.
Can I freeze these?
Absolutely. Freeze the cheesecakes before adding the raspberry topping.
Can I use homemade raspberry sauce?
Yes. Homemade raspberry sauce works beautifully and adds fresh fruit flavor.
How far ahead can I make them?
Prepare them up to two days in advance and decorate just before serving.
Final Thoughts

These Bloody Brain Cheesecake Bites are the perfect combination of spooky presentation and irresistible flavor. With their creamy no-bake cheesecake filling, crunchy chocolate crust, realistic brain topping, and dramatic raspberry « blood » drizzle, they make an unforgettable Halloween dessert that looks impressive but is surprisingly simple to create.
Whether you’re hosting a Halloween party, preparing treats for a classroom celebration, or simply looking for a fun seasonal dessert, this recipe is guaranteed to be a crowd favorite. Make them ahead, decorate with your favorite spooky touches, and watch them disappear long before the night is over. Happy Halloween! 🎃👻